A DIY dry box is one of the easier projects you can do. A dry box or a dry cabinet is used to keep your camera and lenses free from fungus.
Fungus grows in humid conditions, so storing your camera or lenses in a camera bag for long is not really a good idea.

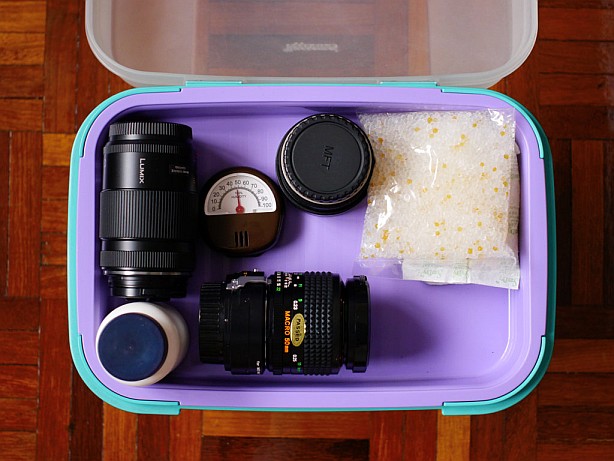
How To Make a DIY Dry Box
A DIY dry box is quite simple to make. Get a fairly air tight box, enough silica gel to act as dehumidifier or desiccant i.e moisture absorber, and you are done. It will cost around RM 50 or so.If you want to be a bit more fancy, you can get a hygrometer to monitor the humidity level in your DIY dry box.
What I like about DIY dry boxes is their “modular” in nature. If you have more lenses or camera, get another box or switch to a larger box.
You can also bring a dry box with you on trips to keep your gear nice and dry.
Silica gel can be rejuvenated or regenerated for reuse, and will last for years if you don't over heat them.
How much silica gel is needed in a DIY dry box?
This depends on the amount of moisture in the air, and the size of your box.Based on a box size of 16 cm x 16 cm x 10 cm, I usually put in 2 packs of 50 gram silica gel. It reduces the relative humidity, RH% from 75% to around 45%.
For a larger box of 20 cm x 20 cm x 29 cm, I found that 6 to 8 pack of 50 gram silica gel is better since the silica gel can absorb more moisture thus it takes about 2 months before I need to regenerate the silica gel. Read further below.
Regenerating silica gel
To regenerate, rejuvenate or some say re-charge silica gel, you need to heat the silica gel beads in a conventional oven at around 115 - 120 C for about 20 to 30 minutes.You can also use a microwave oven on low heat.
Heating the silica gel beads on high with a microwave oven can cause it to crack because the moisture expands too fast within the beads.
Get indicating silica gel, those that has a dye to indicate whether they are wet or dry. As you heat them in an oven, or a microwave, you can see the color slowly change.
Silica gel with orange indicating dye is safer than blue indicating silica gel, which contains cobalt chloride (a carcinogen).
Orange indicating silica gel does not contain cobalt chloride is orange when dry, and green or colorless after they absorb moisture.
Blue indicating silica gel, is deep blue when dry, and pink when after it absorbs moisture.
Once they have changed color, remove them from the oven, let them cool, and repack them for use.
You can use plastic bags or plastic bottles.
How to adjust the humidity levels (RH%) of your DIY dry box
Too little silica gel in a large box, the humidity might still be too high.If you have too much silica gel in a small dry box, then the humidity could be too low, so how to you adjust the humidity?
You'll need a hygrometer for this. You can get a hygrometer from ebay Malaysia.
Get extra silica gel but don't exposed them to air in the dry box.

DIY Dry Box Humidty Control
I keep the extras in a plastic bottle but do not open the bottle, so the silica gel is not absorbing moisture in the dry box. Vitamin bottles works great.
When I see that my hygrometer level starts to go up, I open the cover of the plastic bottle and allow the silica gel to get to work, absorbing more moisture.
That how you adjust the humidity in your DIY dry box. With extra silica gel, it helps you maintain the humidity at the same level for a longer time. Instead of regenerating them every month, it requires only 2 months once.
With this method, you can reduce the number of times you need to heat silica gel.
What about certain types dehumidifier
Certain type of dehumidifier creates salt containing liquid. I would not suggest using this type of dehumidifier in a dry box.When you use this type of dehumidifier, you will notice there is liquid collected at the bottom. The liquid is a type of salt solution.
If such containers leaks, and that has happened to me, (fortunately though, it was in the clothes closet), your camera gear will be ruined.
A dry cabinet or a dry box
If money, space, and/or spousal agreement is not an issue, a dry cabinet might be a good choice. Your only issue would be how big a cabinet to get.A dry cabinet is convenient. It works automatically. All you have to do is plug in a power socket, set the correct humidity level at around 45% +/-, load it with camera gear and it’s done.
I gone through the thinking about getting a more expensive but automatic dry cabinet but for now I am still using 2 DIY dry boxes. You can also travel with a small DIY dry box. Try doing that with a cabinet.
For a beginner or hobby photographer, with just have a camera, and one or two lenses which you use all the time, a dry cabinet might be overkill. I've kept some legacy lenses in the boxes I have, and they have been fungus free for years.
If you have the money, by all means, but why spend money on non essentials.
A small basic dry cabinet costs around RM 300. If you outgrow it, then you need to buy another dry cabinet.
Some spouse (ahem) might not appreciate you spending even more money on camera gear, let alone accessories like a cabinet. To them it looks like a display cabinet.
If you are in Malaysia, you can get silica gel here.
No comments:
Post a Comment